Playing Piano
Using the XIAO MIDI Synth module which contains the XIAO ESP32-C3, quickly create a controller UI to test the sweet sounds of this cool little product. Use as a starting point to a more extensive web controller.
The problem we're solving
A keyboard is an awkward thing to hand-build for a microcontroller: a dozen buttons, a dozen wires, a dozen debounce routines, and a panel to mount it all in. Note that the interesting part — turning a key into a tone — is buried under the mechanical work.
The keys don't have to be physical. ESP-GenUI's Piano node renders a real one-octave keyboard on the page the ESP32 serves, so the phone in your pocket is the keyboard. The board only has to make sound. Press and release events both arrive, which is what separates a keyboard action from a row of buttons.
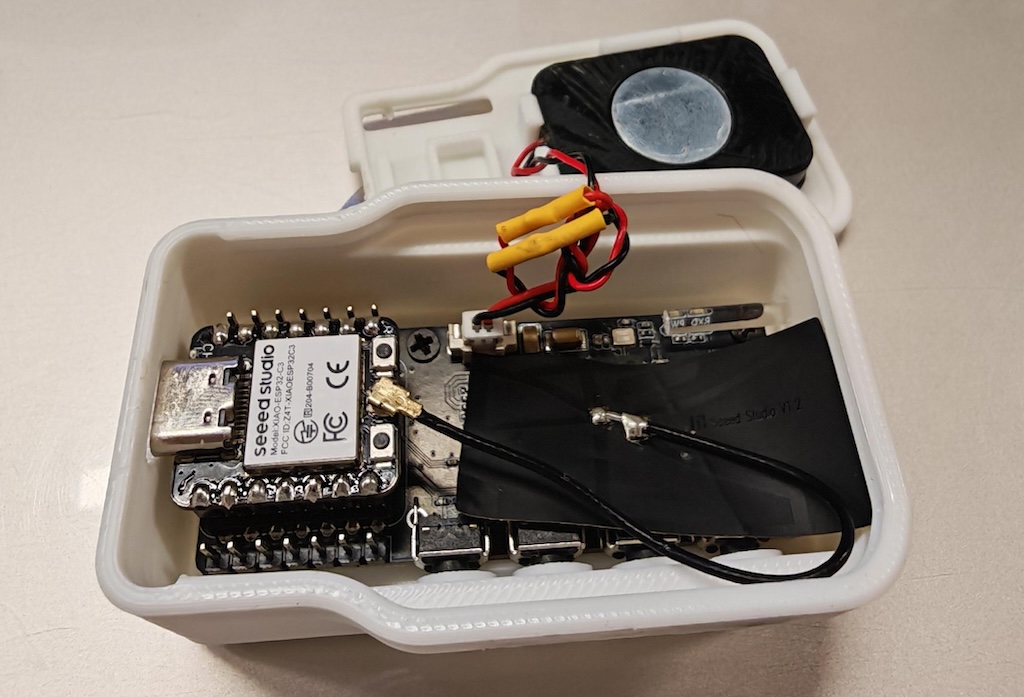
The board and the sound path

The Seeed XIAO MIDI Synthesizer packs an impressive amount of musical capability into a tiny package. Powered by a Seeed XIAO ESP32-C3 and the professional SAM2695 MIDI synthesizer chip, it supports up to 64-note polyphony and more than 100 built-in instrument sounds, making it capable of everything from pianos and strings to drums and synths. It includes a built-in speaker and amplifier, a 3.5 mm audio output, USB-C connectivity, and onboard buttons for standalone operation. Best of all, it's fully programmable and open-source
How a key press becomes a note
The chain is short: a key on the page → one callback on the device
→ a frequency on the output pin. Unlike a row of buttons, the whole
keyboard shares a single callback —
onPianoKey_<id>(uint8_t note, bool down) — and the key you
touched arrives as the note argument. Twelve keys and two edges would
otherwise be twenty-four stubs to fill in by hand.
Step 2 Describe it — let AI build the diagram
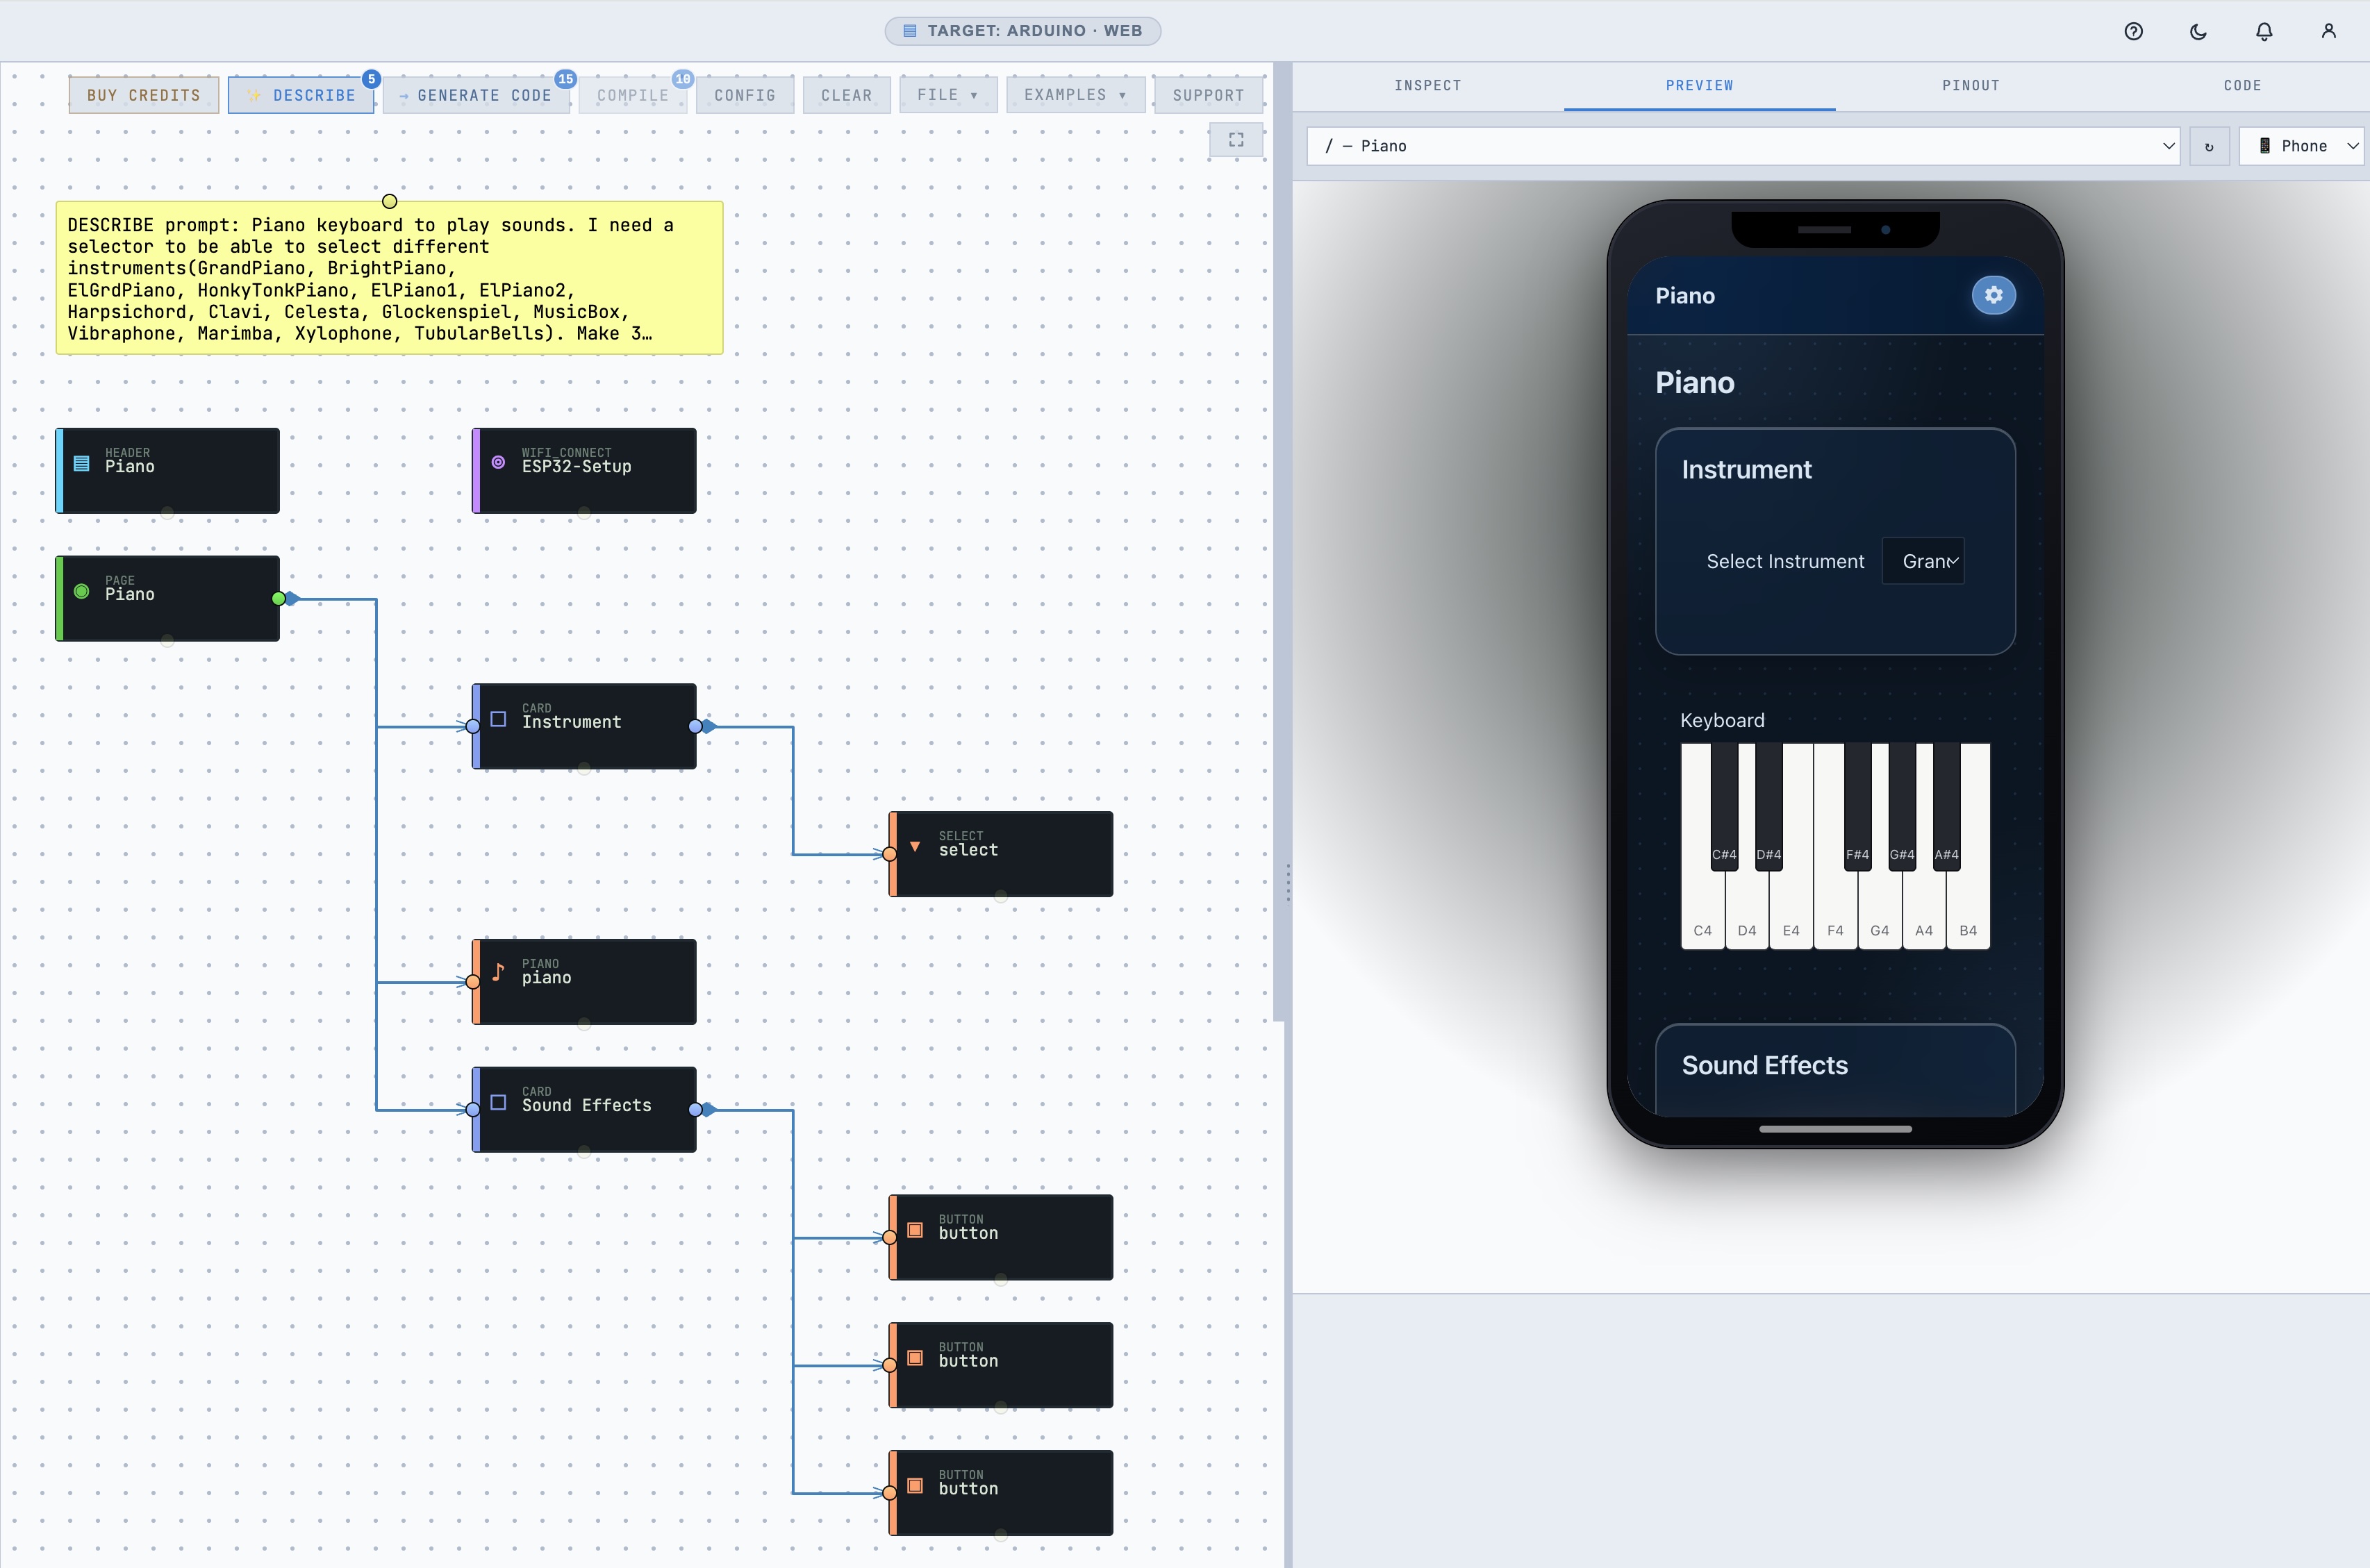
Open the editor. Instead of dragging modules onto the canvas one at a time, click ✨ Describe and tell it what you're building in plain English. The AI assembles the whole diagram for you — the page, the keyboard, and the wiring between them — so you go from a sentence to a working starting point in one step. For this project, paste something like:
"Piano keyboard to play sounds. I need a selector to be able to select different instruments(GrandPiano, BrightPiano, ElGrdPiano, HonkyTonkPiano, ElPiano1, ElPiano2, Harpsichord, Clavi, Celesta, Glockenspiel, MusicBox, Vibraphone, Marimba, Xylophone, TubularBells). Make 3 buttons each called "Phone Ringing", "Bird Tweet", and "Applause". Don't put the keyboard in a card."
— what Describe comes back with: a Page, a Header, a Piano node, and a WiFi Connect step so the board can join your network on first boot. Additionaly, a choice selector with the options that I specified in the describe and the three buttons below.
Set the keyboard's properties
Describe designs the interface; you finish it in the Inspector. Click the Piano node and set:
| Property | Set it to | What it does |
|---|---|---|
| Label | My Cool Keyboard | The caption above the keyboard |
| Octave | 4 | Which C the twelve keys start on (0–8) |
| Numbering | MIDI note number | Whether note is a MIDI number or a key index |
| Key labels | yes | Prints the note names on the keys |
| Top margin | 10 | Spacing above the keyboard on the page |
// piano/Keyboard). That comment is how
you'll find your stub in Step 3 — especially if you add a second
keyboard later.Step 3 Sound the notes in Callbacks.h
When you generate, Callbacks.h arrives with one stub for the whole
keyboard. Every key, both edges, one function — you fill in the body and
you're done.
onPianoKey__4632ci…), and the rest of the
sketch calls it by that exact name. If you retype it with a friendlier name of
your own, the build fails with 'onPianoKey_…' was not declared in
this scope. Fill in the body of the stub already in the file and
leave its name exactly as generated.Here's the shape of what's in your Callbacks.h; find the stub by its
// piano/… comment and copy the real name from there:
// piano/My Cool Keyboard — note is a [MIDI number | key index]; // down is true on press, false on release. inline void onPianoKey_<id>(uint8_t note, bool down) { // TODO: react to a key on "My Cool Keyboard" going down or up. Serial.printf("Piano p8hd2l: note %u %s\n", note, down ? "down" : "up"); }
— then the real thing: the finished body for the audio path this guide uses, with the library calls. This guide uses the Seeed Arduino MIDIMaster Arduino library to communicate with the synth module. Add the following lines of code to the Callbacks.h file.
demo.ino
void setup() { : synth.begin(COM_SERIAL, MIDI_SERIAL_BAUD_RATE); site.begin(WIFI_SSID, WIFI_PASS); }
Callbacks.h
// Include the synthesizer library and create an instance of it #include "SAM2695Synth.h" #define COM_SERIAL Serial0 #define SHOW_SERIAL Serial SAM2695Synth<HardwareSerial> synth = SAM2695Synth<HardwareSerial>::getInstance(); uint8_t currentInstrument = unit_synth_instrument_t::GrandPiano_1; // select/Select Instrument inline int setSelect_<id>(int index) { // Configure the instrument (Bank, Channel, Value) currentInstrument = index; synth.setInstrument(0, 0, currentInstrument); return 0; } // Note: The following callbacks change the instument setting in order // to produce specific sounds. Logic should be added to switch the // instrument back when completed // button/Phone Ringing inline int onButtonClick_<id>() { // Turn on/off the note that corresponds to the phone ringing sound synth.setInstrument(0, 0, unit_synth_instrument_t::TelephRing); synth.setNoteOn(CHANNEL_0, NOTE_E4, VELOCITY_DEFAULT); delay(1000); synth.setNoteOff(CHANNEL_0, NOTE_E4); } // button/Applause inline int onButtonClick_<id>() { // Turn on/off the note that corresponds to the applause sound synth.setInstrument(0, 0, unit_synth_instrument_t::Applause); synth.setNoteOn(CHANNEL_0, NOTE_E4, VELOCITY_DEFAULT); delay(3000); synth.setNoteOff(CHANNEL_0, NOTE_E4); } // button/Bird Tweet inline int onButtonClick_<id>() { // Turn on/off the note that corresponds to the bird tweet sound synth.setInstrument(0, 0, unit_synth_instrument_t::BirdTweet); synth.setNoteOn(CHANNEL_0, NOTE_E4, VELOCITY_DEFAULT); delay(1000); synth.setNoteOff(CHANNEL_0, NOTE_E4); } // piano/My Cool Keyboard inline void onPianoKey_<id>(uint8_t note, bool down) { synth.setInstrument(0, 0, currentInstrument); if(down) { synth.setNoteOn(CHANNEL_0, note, VELOCITY_DEFAULT); } else { synth.setNoteOff(CHANNEL_0, note); } }
Because this file is yours, your edits survive a regenerate: tweak the diagram and generate again, and ESP-GenUI rewrites the site files but merges your callbacks instead of overwriting them.
Step 4 Generate, compile & flash
- Note: The AI generated code configures the WI-FI in Access Point mode with a SSID name of "ESP-Setup". You will need to connect to the device as an AP on first contact. There you will be able to configure it for your network.
- Click Generate Code. You'll get a complete Arduino sketch —
demo.ino,EmbeddedSite.h, and your editedCallbacks.h. - Plug the board into your computer with USB-C. In a Chromium-based browser (Chrome or Edge), click Compile: in the dialog, Auto Detect Board reads the chip and picks the board, Compile builds it server-side, and Flash to Device writes it over Web Serial — no local Arduino IDE needed.
- Prefer your own toolchain? Use Download ZIP, or — on Chrome/Edge — Save to Folder, which writes the sketch straight into a folder on disk and remembers it, so the Arduino IDE, PlatformIO, or VS Code picks the files up in place each time you regenerate.
'onPianoKey_…' was not declared in this
scope? The stub in Callbacks.h was renamed or rewritten, so
its name no longer matches what the rest of the sketch calls. To recover:
- Regenerate
Callbacks.h(Generate Code again, or accept ESP-GenUI's stubs in the Save-to-Folder Diff/Merge). This restores the stub with its correct generated name. - Move your logic into the stub body — find the
// piano/…stub and fill it in as in Step 3. Delete any leftover function you'd named yourself. - Compile again.
Step 5 Play it
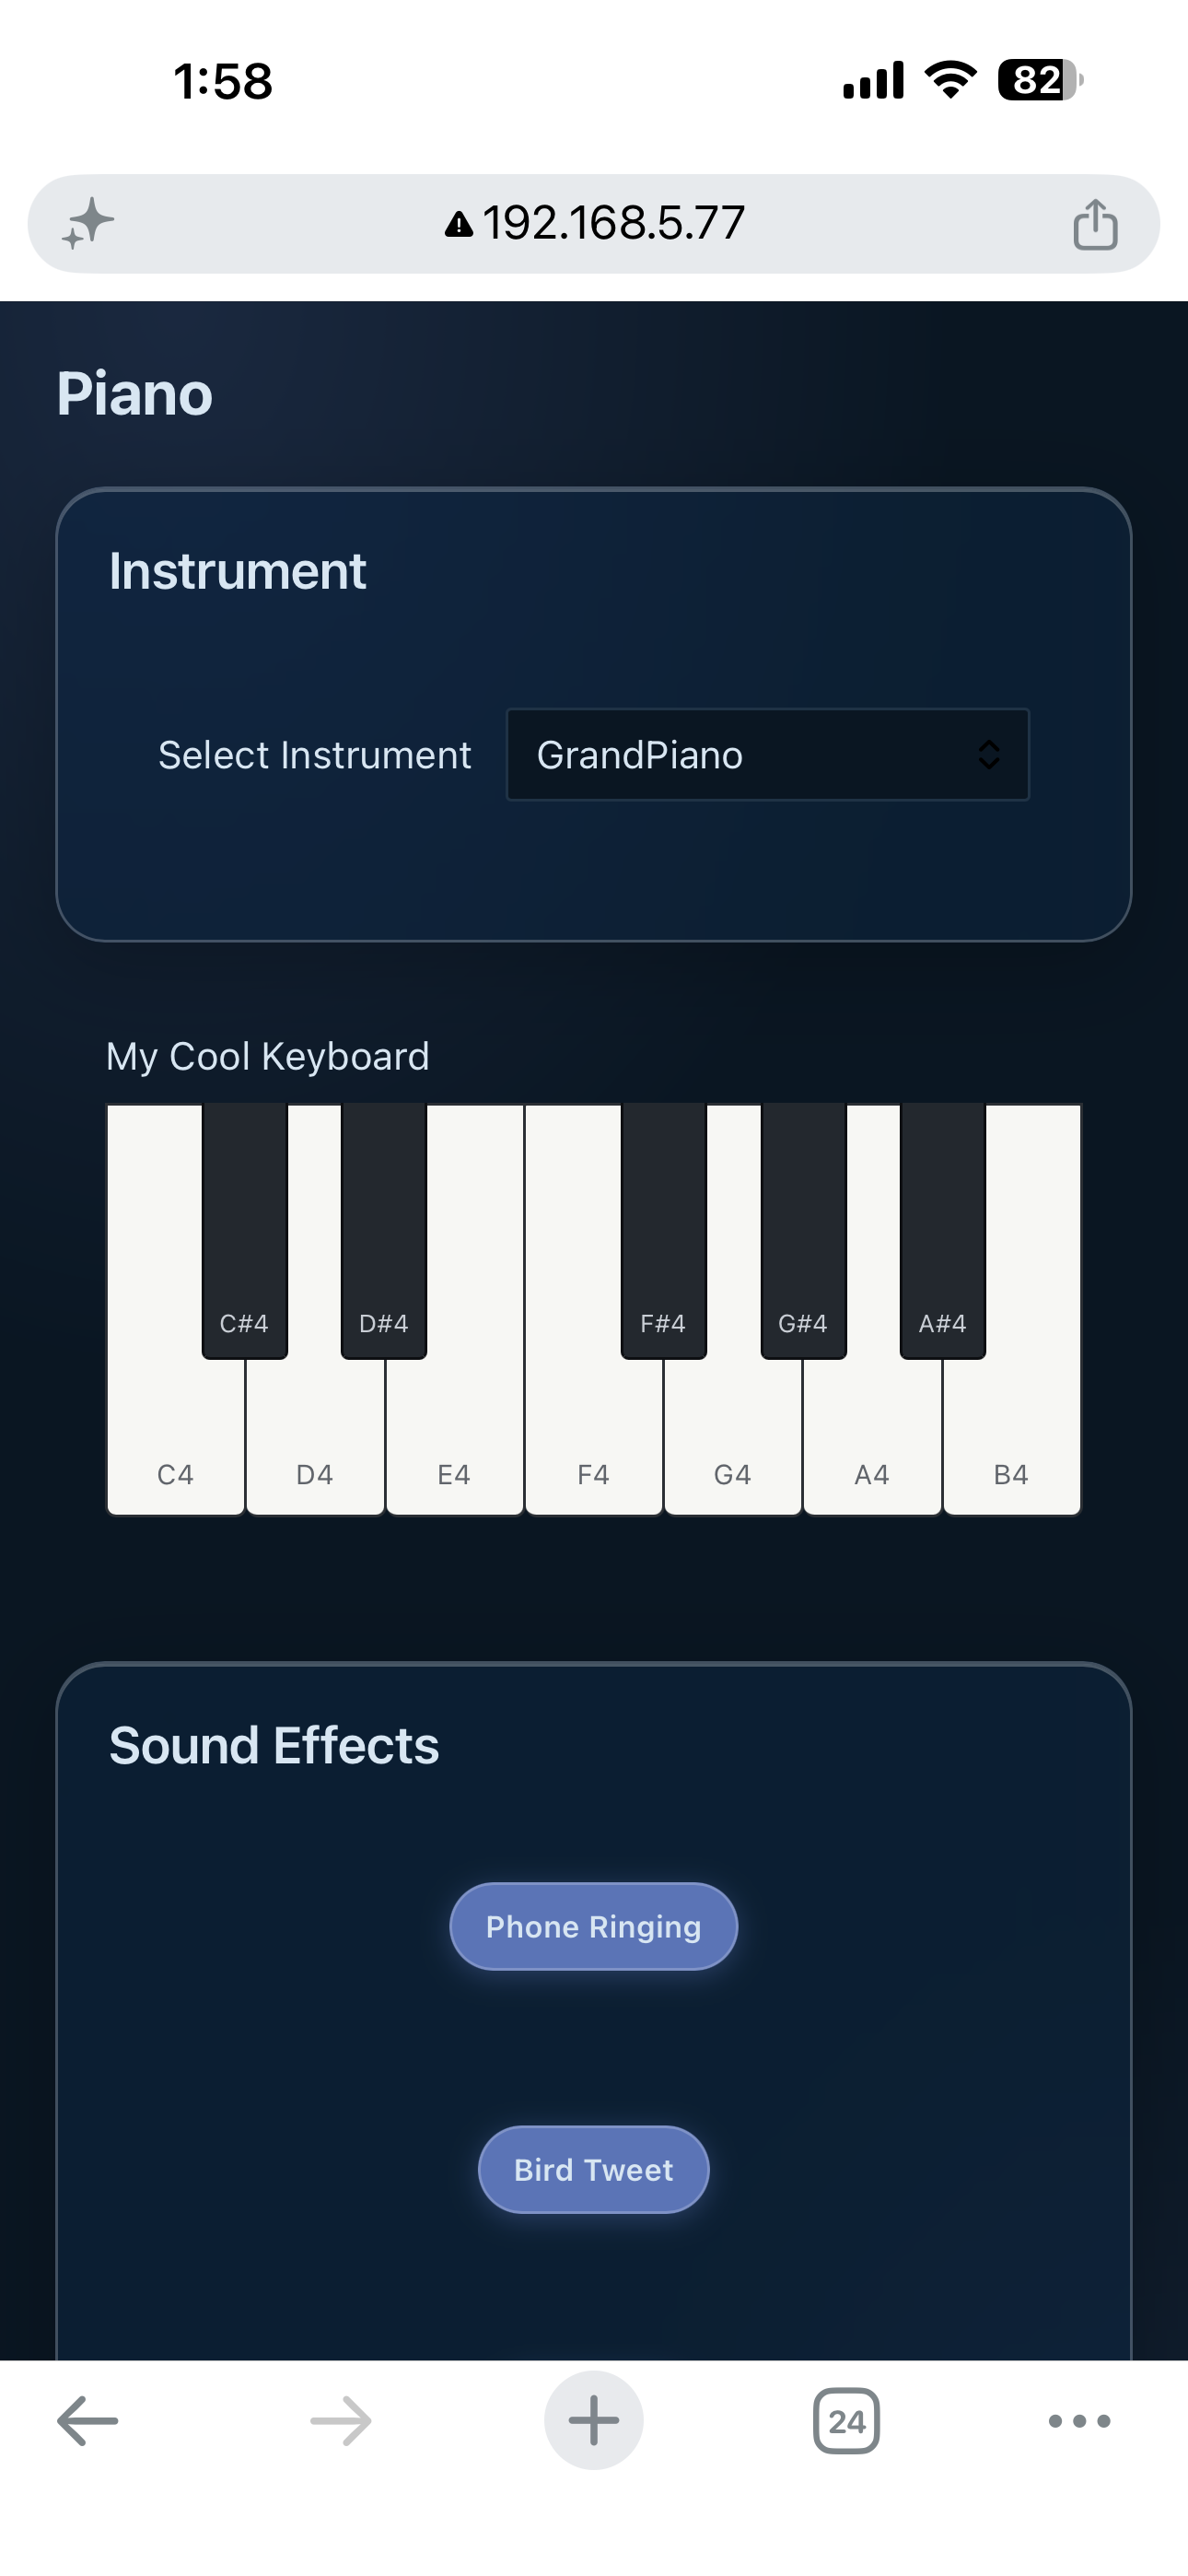
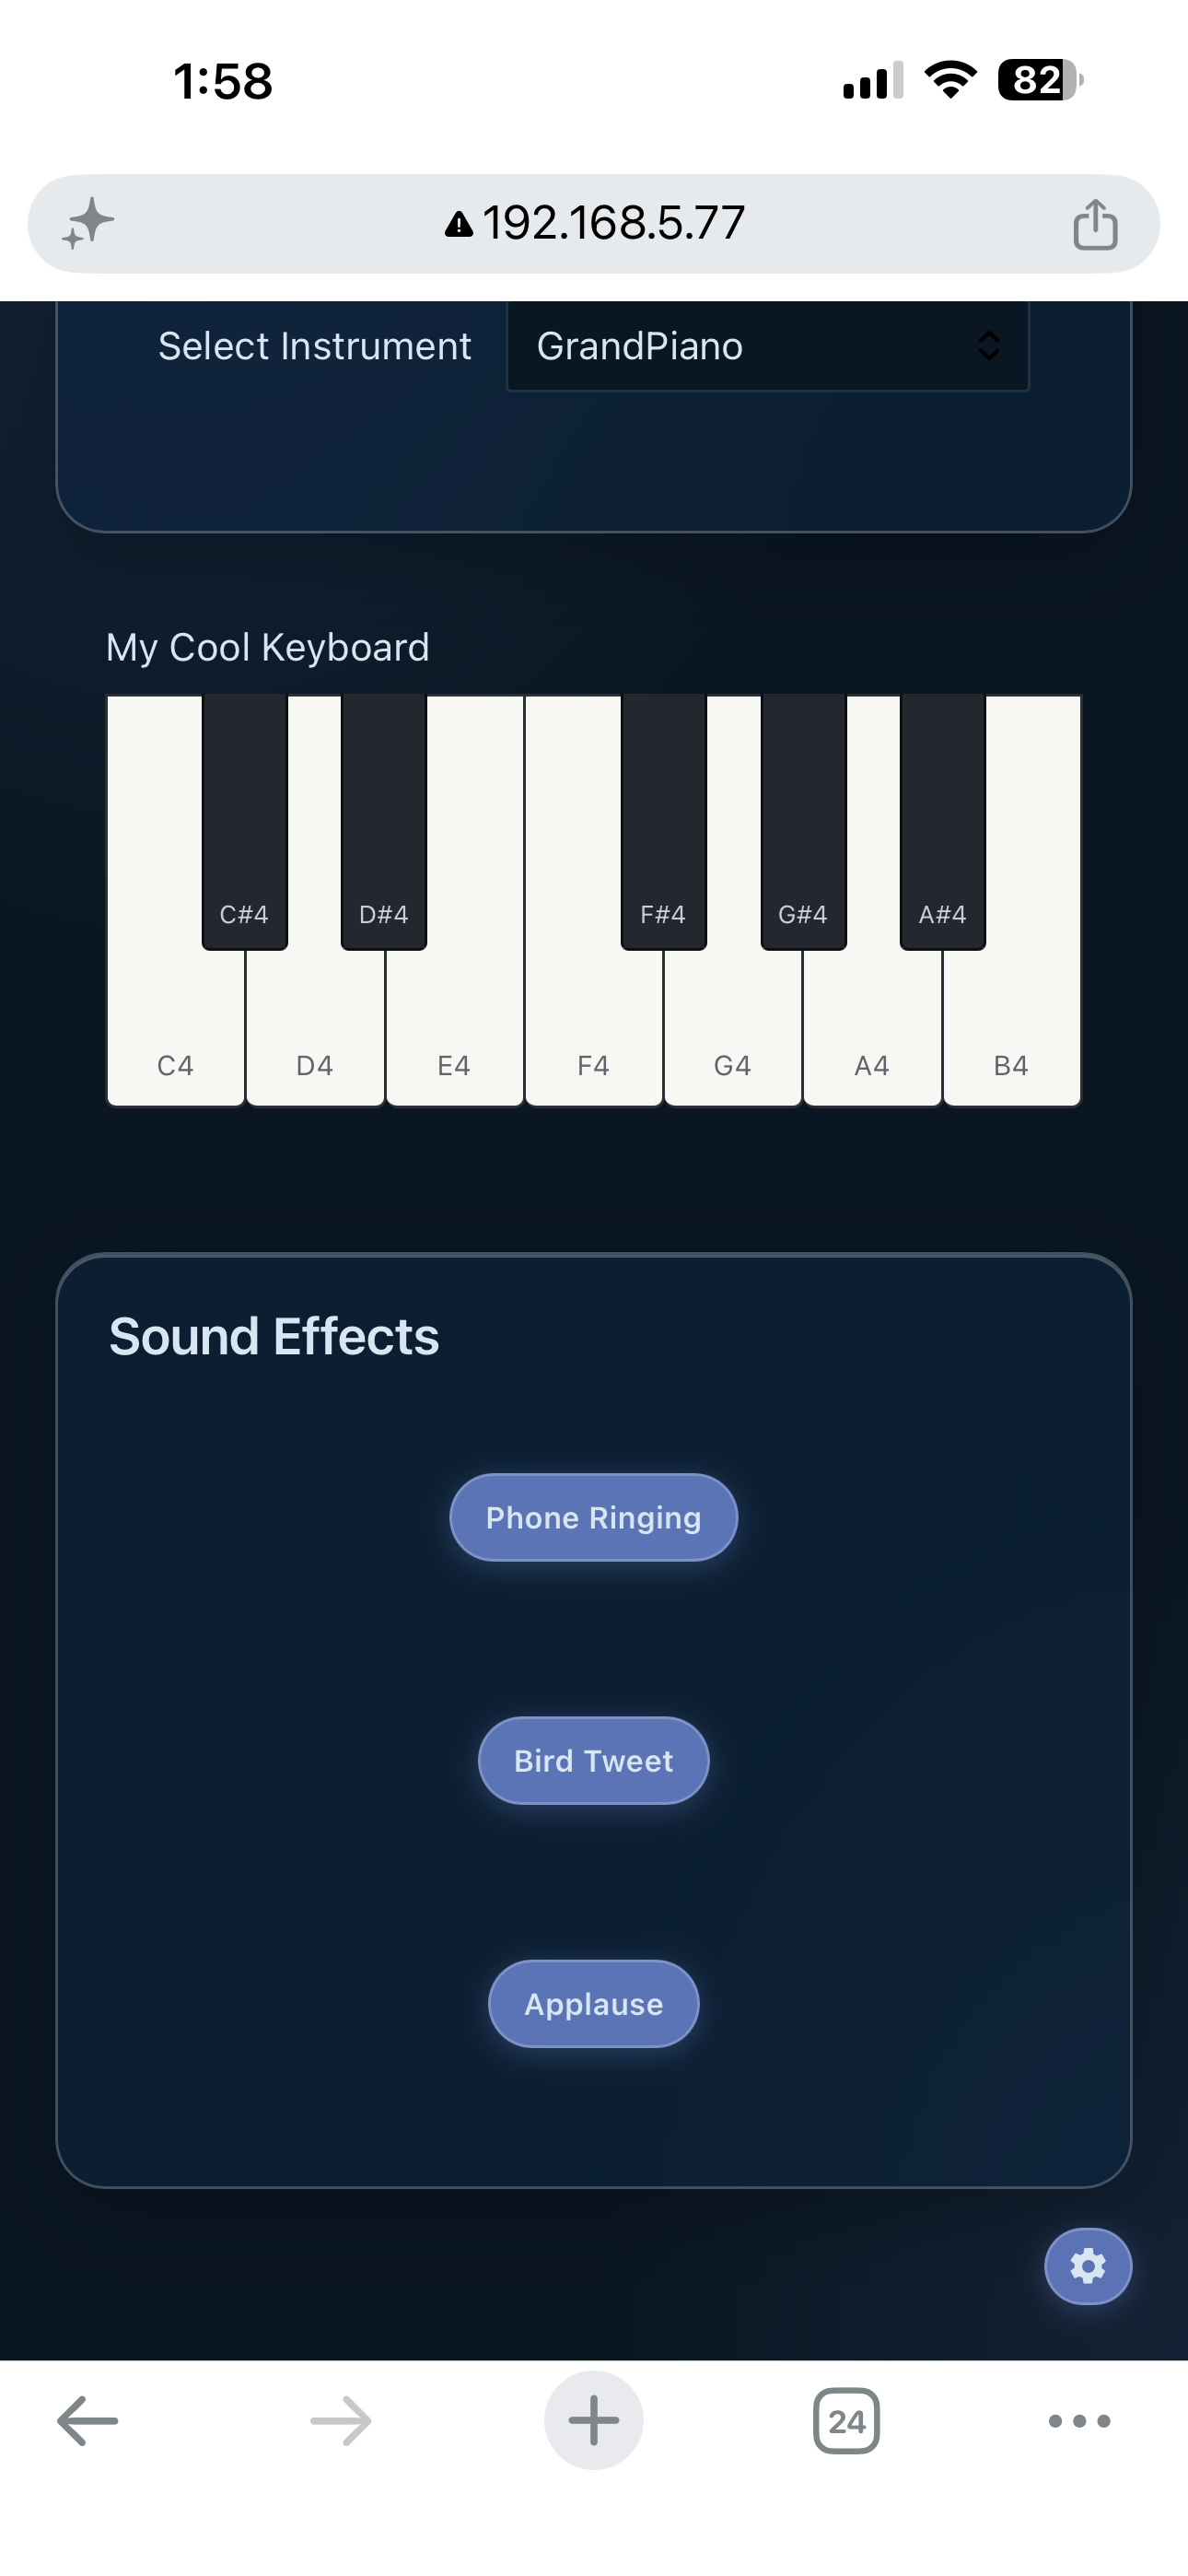
After flashing, the board joins your Wi-Fi and serves the page at its IP address. Open it from a browser on the same network and:
- Press one key. Confirm you hear the right pitch and that it stops the instant you let go.
- Walk the octave. Play C through B and check the pitches rise evenly — a wrong formula usually shows up as an octave that stretches or compresses toward the top.
- Slide across the keys. A glissando should sound each key and leave nothing droning; the release fires as your finger leaves a key.
Where to take it next
- More range. Add a second Piano node an octave up, or an octave-shift control.
- See what you play. Light a NeoPixel per note, or log the last few notes to the on-page console.
That's the pattern for every guide here: pick real hardware, wire it, sketch the interface, map a few callbacks, and flash.